I know it's difficult to be thankful for new TEKS when they are not exactly what we would have written ourselves; some seem too vague and others are out of left field. After years of teaching and analyzing state assessments, I can assure you it is the verb in the TEKS we need to focus on and develop our lessons around. So, as you are going through the new TEKS this year and focusing your lessons to meet the new challenges of the STARR Assessments or EOC Exams, carefully read and reread the TEKS which cover the content you are going to teach while focusing on the verb and the outcome expected of the student. The verb will explicitly direct you to the level of questioning and depth you should cover the material in class. Honestly, we over-teach some material and other material we are not teaching in-depth enough. If our kids are going to be successful on the new state assessments, we have to prepare our lessons and activities to reflect the level of understanding the state is looking for from our students.
When working with the new TEKS at my desk, I actually highlight the verb and immediately compare it with a classic Bloom's Taxonomy hierarchy I keep on my desk to refer to as I develop and redevelop existing lessons. For example, the state last year may have simply used the language "the student should be able to identify" where they are now asking that "the student should be able to compare and contrast". This verb change takes the learning to a whole new level. In turn, you will have to tweek your old lesson to meet that change. If the TEK I used as an example were regarding the concept of cell organelles, this simple "verb" trick will let you know you can no longer just teach the kids to memorize a picture or be able to recognize and identify an organelle when drawn or labeled by its function. Now, students have to consider both the form and function of the organelles to be able to do the higher-level cognitive task of comparing and contrasting their form and/or functions within the same cell or between plants and/or animals. WOW~ That's a big leap! I will say that the cognitive levels have moved up the pyramid quite a bit and we are expecting more out of our students. Consequently our lessons and activities will have to be more multi-functional than ever because the amount of time we have with the kids has not increased. We really have to plan well to yield a bigger bang for our buck. Trust the verbs in the TEKS and make sure your quizzes and other forms of assessments are written to assess the students at that level of understanding. This alignment will make the transition to the new state assessments easier for everyone.
Monday, November 29, 2010
Sunday, November 28, 2010
Tornado in a bottle

What you need: Clear plastic soda bottle (12 oz to 1 L in size); dishwashing liquid; glitter; a pencil; water.
What to do: Add a couple of drops of dishwashing liquid into the bottle (a few more for a larger bottle). Slowly (to avoid making a lot of bubbles), add water down the sides of the bottle to fill it. Leave a little space at the top. Dip the tip of your pencil in water, and then use the wet pencil tip to pick up some of the glitter. Dip the pencil with the glitter into the bottle to release it into the mixture. Cap the bottle tightly. Give the bottle an abrupt circular swirl. Repeat as necessary to create a vortex ("tornado"). The glitter will make the vortex more easily visible.
How did it work? When you rotate the bottle, the water in the bottle starts rotating, as well. The rotating water creates a centripetal force which pulls it toward the center of the bottle. At the same time, gravity pulls the water down. The result is a vortex, which is larger at the top, because of the space at the top of the bottle, and smaller at the bottom, because gravity is pulling the water down to counteract the vortex. The dishwashing liquid (a surfactant) helps suspend the glitter.
Thanks to Tijani Osumah for contributing this activity. It is probably best suited for grades K-5, but let's face it, making a vortex generator is fun for everyone. Here's a YouTube video that also shows how to make and carry out this activity. Enjoy!
DISCUS Approaching 1000 Users
Following efforts at the Texas State Fair and the Sally Ride Science Festival, we are happy to report that we are nearing 1000 users on the site. Approximately half of these users are students/parents who will find neat science activities in our Activity Corner to be of interest. We are always adding new activities, so check back often. The other half of users include K-12 science teachers from all over the state of Texas (and a few from outside). One of our goals has always been to provide new and exciting educational science resources to users through Texas, but we most certainly want to expand beyond Texas to the national level, as well. Please provide your ideas to us (discus@uta.edu) on how we can help further your science education experience, no matter where you are.
ABCExcercises.org Educational Building Blocks
ABCExercises.org provides a variety of useful snip-its to supplement different teaching lessons in a multitude of fields. The collection is managed by David and John Turrentine and they welcome additional contributions. Of course, these would be great components to also build into DISCUS lesson plans. One very large section of the website is dedicated to science supplements.
Sunday, October 24, 2010
The Floating Safety Pin
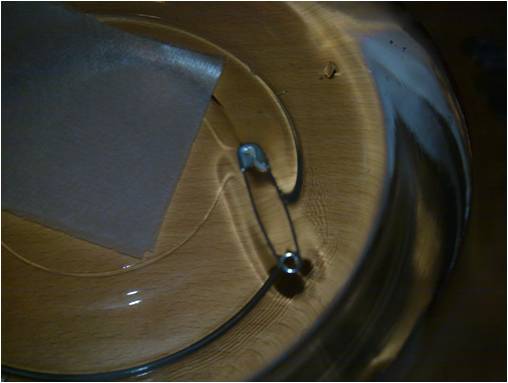
What you need: A dry safety pin; a paper towel square (2 in. x 2 in.); a bowl of water; a pencil or a small stick
What to do: Fill the bowl with water. Then put the paper towel on top of the water and spread it out so that it's flat. Next, carefully place the safety pin on the paper towel. Use the pencil or small stick to gently poke the paper towel until it sinks from beneath the safety pin. If you did this carefully enough, the pin should remain behind floating on top of the water. Amazing!

This activity is suitable for just about anyone who wants to try it, but it does require some care and a gentle touch. A teacher might be able to provide the biggest "wow factor" by first asking the class to try to get their safety pin to float on their own, and then showing them how to do it. Of course, a nice discussion of surface tension can follow. Thanks to Vinh Nguyen of U.T. Arlington for submitting this activity to DISCUS.
Tuesday, October 19, 2010
Find your Footprint with National Geographic

Students will learn about their own "footprint" so they can make a greener world and a greener school, as they develop a project to submit to National Geographic for judging. The campaign also features educational resources and a lesson plan on saving water, saving energy and reducing waste.
Contest: http://www.nationalgeographic.com/findyourfootprint/enter/
Prizes: http://www.nationalgeographic.com/findyourfootprint/prizes/
Sunday, October 17, 2010
Inflate a Balloon on a Bottle
 Blowing up a balloon on your own can be a hassle...the balloon tastes weird and sometimes it is tough to stretch the balloon out. I'm not exactly Billy Mays, but I'm going to try to sell you this great new way (OK, it's not new, it's a reaction as old as time) to blow up a balloon that removes all of the hassle of having to do it yourself. It's safe, fun, easy, and you could just learn a little science along the way. For only $19.95...nevermind, it's cheap and you probably have everything you need at home to do it yourself already.
What you need: a bottle (16 oz - 2 L, as desired; if you use a small bottle, you might want to use less of the key ingredients); funnel or butter knife; balloon; 3/4 cup white vinegar; 2 tbsp. baking soda

What to do: Transfer the baking soda into the balloon using a funnel or the butter knife. Add the vinegar to the bottle. Carefully attach the balloon to the top of the  bottle without letting any of the baking soda fall into the vinegar. Once the balloon is securely attached, tip the baking soda into the vinegar and watch as the reaction proceeds. Vigorous bubbling can be seen in the bottle as the balloon fills with gas.
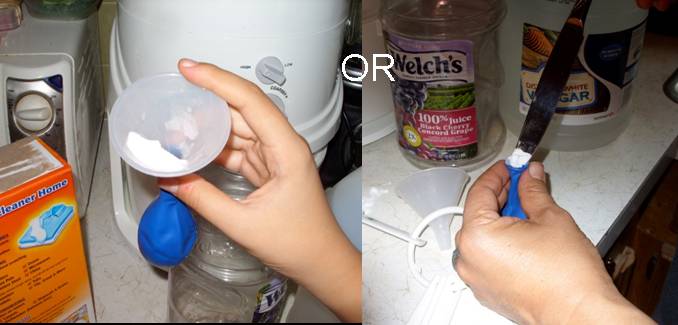 bottle without letting any of the baking soda fall into the vinegar. Once the balloon is securely attached, tip the baking soda into the vinegar and watch as the reaction proceeds. Vigorous bubbling can be seen in the bottle as the balloon fills with gas.
 What happened? What you saw was a rapid chemical reaction. Baking soda (sodium bicarbonate) is a base and vinegar (5% acetic acid) is an acid. When this acid and base are mixed, they react to form water, a salt, and carbon dioxide (the gas). The carbon dioxide builds up pressure in the bottle and inflates the balloon. Try different amounts of vinegar and baking soda to see what combinations create the most gas. Record the amounts of ingredients you use and your observations (you can record how big the balloon is by measuring its circumference with a measuring tape...or a piece of string and a yard stick). Try keeping a science notebook for this and other cool experiments. That way, you'll always remember what you did, so that you can show off for your friends. For teachers, this activity can be used as part of a lesson on chemical change, stoichiometry, acids & bases, or many other topics.
We recommend this activity for elementary to middle school students. If necessary, have your parents help you measure the ingredients and attach the balloon. Thanks to Sabra Ramirez of U.T. Arlington for submitting this activity to DISCUS. Sabra credits "Exploring Creation with General Science" by Dr. Jay L. Wile for the preparation and demonstration of this activity.
Have You Thought About Your Teaching Philosophy, Lately?
We are continually asked to set goals for our students, figure out how we are going to get each and every student across the finish line, but how often do you think about your own goals? Back when you were an undergrad you more than likely received an assignment to write a teaching philosophy, but that was before you were in the classroom. Maybe nothing has changed from those views, maybe they have changed so drastically you could benefit from blowing the dust off of that old assignment and rereading your own reflections, but more than likely you need to sit alone for a while and simply reflect on what you have learned from the past years, what works for you, and how can you express that in your own teaching philosophy. My challenge to you is to take the time to reflect and put your own teaching philosphy into words. It will bring back the excitement you felt when you first chose teaching as your profession, it will positively enhance your PDAS review; but moreover, it will define your most essential goals so you clearly understand why you do this job and the rules you prefer to live by in your own classroom. Everybody seems to emphasize different aspects of the job. When I recently rewrote mine, of course I viewed it numbered like a scientific procedure in my mind, so that's the way it went down on paper and I love it. I glued it on bright purple paper and posted it above my desk. I decided I wasn't going to laminate or frame it because I always want to reserve the right to think and change it if I choose to. Strangely, mine was very similar to my undergrad assignment, except I could not rank the importance of their order like I can today. What would yours look like?
My Philosophy of Teaching
Looking back over my years of teaching, I initially became a teacher because I thought it would be the best way I could make the world a better place. However, as time has passed, I still hold this ideal close yet have concluded there are seven personal guidelines which have molded me into an outstanding teacher.
Guideline 1: Make it significant. “Why do I need to learn this?” resonates from the mouths of students in classrooms today. As their chemistry teacher, it is my duty to ensure my students see how chemistry surrounds them in every aspect of their life. From the chemistry of fireworks, electrons producing light, ionic compounds and electrolytes needed for proper hydration on the football field, my students understand the relevancy of chemistry in their world. The labs and activities I choose to do with my students are intentionally chosen to enhance relevancy to my current group of kids.
Guideline 2: Make the kids laugh. I honestly feel laughter is a powerful tool in learning which is all too often quickly dismissed by even the finest of teachers. I quickly learned my students need to trust me and know I am emotionally invested in their success. Laughing is a crucial aspect of this bonding experience. I believe if you make them laugh, you get their attention in the process. They become emotionally connected and invested in the material and suddenly, like magic, permission is granted to teach and they will learn. Be cautious with this guideline, though, because more times than not they will make you laugh uncontrollably.
Guideline 3: Make learning fun and inclusive. Our class periods are 90 minutes long. In order to keep the attention of the students and to use every minute of class time, one must be creative. Creative techniques come in many forms. Sometimes labs are appropriate, other times there are hands-on activities, simple demonstrations, or activities which get the kids up and about, and most of the time, the use of technology is required. I love to use my Promethean board interactively with my students. Letting them interact, choose their own colors, and work problems allows the class to bond and become responsible for each other’s learning.
Guideline 4: Have high expectations. I have learned that children will rise to whatever expectations you set for them. Striving to push the kids to learn more and do more than they have ever expected of themselves is a very rewarding experience. Many expect students would love having a class that is an easy one. This is only true for a few weeks. Each year, when I encounter former students, I am always proud to hear them say, “I love Mrs. Cruze’s chemistry class. Even with the most difficult material, she made it so easy to learn!”
Guideline 5: Always try new things. This is a very important guideline more for me as the teacher than the students. To keep things new and exciting, it is imperative to frequently attend conventions, collaborate with other teachers, and research new ideas. This keeps the curriculum current as well as challenging for the teacher. Every year, I make an effort to change our hands-on activities, experiment with new project ideas, and try out new laboratory investigations.
Guideline 6: Be sure to share. On my kindergarten diploma, it says “You have graduated from kindergarten because you have shown the ability to share and play well with others.” This is one of those life guidelines which should have been ingrained in our brains since those early days in the sand box. Share everything! If you find a cool activity online, share it. If you make a new presentation, share it. If you create a new lab or game, share it. The benefits of sharing are immeasurable because when you share, even more students will benefit in the long run, and that is what matters.
Guideline 7: In my opinion, this is the most important guideline of all. The relationships you develop with your students are more important than anything else. The kids can tell if you enjoy what you do, and they can also tell if you enjoy being their teacher. I was talking to one of my former students a few weeks ago, who has been out of high school for about seven years. Some of the content we covered many years ago was not so clear in her mind, but she did remember the relationship we developed. She told me what made me special as her teacher was how I made her feel. She shared with me that I was always fair and decent to everyone. Moreover, I was genuinely concerned with each and every student’s success in class and always found a way to motivate them. She remembered a sticky note a laid on her desk the week of Thanksgiving which said, “You are one smart turkey and I am so glad to have you in my chemistry class.” She still has the note today. This is the most rewarding thing I have ever heard; well, other than “I became a teacher because of you.”
I have the gift of making students laugh. I have the gift of making learning fun and relevant. I have the gift of challenging students to love science. I have the gift of compassion, showing students that I care. So even if I have now discovered I cannot change the world in the ways I used to imagine, I do have gifts that allow me to influence the world, one student at a time. I have the gift of being able to do this every single day.
Wednesday, October 13, 2010
Bright and Shiny Pennies

What you need: A few old pennies; 1/4 cup white vinegar; 1 teaspoon table salt (sodium chloride); a non-metal bowl; paper towels.
What you do: Combine the salt and vinegar into the bowl and stir well. Place the pennies in the bowl for approximately 30 seconds. Don't leave them in there too long (or do, and see what happens). Remove the pennies, rinse them with water and dry. In less than a minute, you've gone from old dull penny to new shiny penny...now where's that gumball machine?
How does it work? Pennies are made from the metal copper. Over time, the copper reacts oxygen in the air to form a chemical compound called copper oxide on the face of the penny. Copper oxide gives old pennies that dull, greenish color. Vinegar is an acid which reacts with copper oxide, causing it to dissolve away from the penny. The salt increases the solubility of copper oxide, which means it allows more copper oxide to dissolve in the vinegar solution. If the pennies are left for too long, a light blue-green color will form on their surface. This compound is called malachite, and it is caused by the reaction between copper, oxygen, and vinegar. So, just the right amount of time in the vinegar will give you that shiny penny you desire.
This is a great activity for pre-K up to 5th grade students. The chemical change at the surface of the penny is striking, and it happens so quickly that it is impressive. Put some pennies in water for a comparison experiment that doesn't do anything. Leave another set of pennies in a vinegar solution for longer to see the formation of malachite. Thanks to Patricia Wong of U.T. Arlington for contributing this activity to DISCUS. Patricia cites a chemistry blog by Anne Marie Helmenstine on about.com for inspiration for this activity. That blog entry can be found here.
Egg in a Bottle

What you need: a hard-boiled egg, deshelled; an empty Gatorade bottle; a strip of paper (~3 inches x 3 inches, rolled up); a match or lighter.
What to do: Light the paper with the match or lighter and drop it into the Gatorade bottle. Quickly take the egg and place it over the opening. Watch as the egg is sucked into the bottle, all on its own.
How does it work? Before you start, the pressure on the inside of the bottle and the outside of the bottle are the same. When you drop the lit paper into the bottle, you heat the surrounding air, causing it to expand. When you place the egg on the top of the bottle, the fire inside the bottle quickly uses up all of the oxygen and goes out. At that point, the air in the bottle cools and contracts. When this happens, the pressure outside the bottle is greater than the pressure inside the bottle. This difference in pressure causes the egg to squeeze through the opening into the bottle. Magic? No... Science!
BE CAREFUL performing this activity at home - it requires fire. We recommend this activity for high schoolers and also recommend adult supervision. Instead of a plastic Gatorade bottle, an old glass milk bottle is a great alternative. Always use care when performing experiments that require open flame. Thanks to Krishna Pabba of U.T. Arlington for contributing this demonstration to DISCUS. Krishna credits information he obtained from a University of Wisconsin website for this activity. It can be found here. Also, another U.T. Arlington student, Patricia Wong, performed this activity and took a nice video, which can be found here. Thanks Patricia.
Tuesday, October 12, 2010
Look Ma! No hands! (Deshell an Egg with Vinegar)
 I know. I hate it too. You try to peel that hard-boiled egg and it takes forever, it's messy, and you lose some of the good stuff with the shell. Well, try this instead. It takes a little longer (OK, a lot longer...about 2 days), but it's still pretty neat.
What to do: Fill one glass with vinegar and one glass with water. Leave enough room in each so that you can put one hard-boiled egg in each and no liquid overflows
 |
| after 6 hours |

Basically anyone can do this activity, as long as they have a little patience. To understand some of the concepts of acids and bases, we recommend this activity for 6th - 8th grade students. Thanks to Nam Tran of U.T. Arlington for contributing this activity. Nam credits the great lesson he obtained from the "Science Junction" home experiments website hosted by N.C. State University (there are a couple of other activities there, which we will cover later, too). Tell us what you think. (You can even eat it afterward...we didn't, but tell us how it tastes)
Dancing Raisins

What you need: A tall, clear glass or cup; 1 can of club soda, sprite, or seltzer water (can't be flat); raisins. Really, that's all.
What to do: Pour the soda in the glass and drop a few raisins in. Watch the raisins go up and down for up to 5 minutes!
How does this work? Initially, the raisins sink, but then as bubbles from the carbon dioxide in the soda form on their surface, it causes them to rise again. Soda contains dissolves carbon dioxide (CO2), which slowly bubbles out of solution over time. These bubbles attach to the raisins and eventually provide enough lift to carry them to the top of the glass. When the raisins reach the top, the bubbles burst and the carbon dioxide is released into the air above the liquid. The raisin then sinks and the process repeats itself. Simple, but cool.
This is one of those actitivies that is better observed in video, than in pictures. To see a short video of the dancing raisins, click here. Thanks to Patricia Wong from U.T. Arlington for contributing this activity to DISCUS. It is safe and simple...great for elementary school children or even pre-K. When the students look close enough they can even see the bubbles forming on the raisins that causes them to rise to the top. Ask them what they think is happening (Try it with chocolate chips, too). Patricia cites Mary Elizabeth off of pbskids.org for this activity, a URL for which can be found here. As always, we would love to hear your comments about this activity. Did it work? How can you make it even better?
Monday, October 11, 2010
Secret Message Revealed

What you'll need: Medium-sized bowl; Tincture of iodine (this can be purchased at any drug store); Q-tip or small brush; lemon; notebook paper; and cup.


Thanks to Sabra Ramirez of U.T. Arlington for preparing and presenting this activity for DISCUS. Sabra obtained information about how to do this activity from Janice VanCleave's "Chemistry for Every Kid: 101 Easy Experiments that Really Work," published by John Wiley & Son's, Inc. We hope you enjoy this activity, as well as try many of the other activities we have posted in our Activity Corner. If you have your own suggestions for neat at-home activities, let us know about them.
Sunday, October 10, 2010
Colored Foamy Fountain (Elephant Toothpaste)

You'll need these materials: Safety goggles; 16 oz. empty plastic bottle; 0.5 cup of hydrogen peroxide (6% or "20-volume" is good and can be obtained at a pharmacy or salon); 1 tbsp. dry yeast; 3 tbsp. warm water; 1 tbsp. dishwashing soap; 8 drops of food coloring (be creative with colors!); a small cup for mixing water and yeast; a small funnel.


What's happening? Hydrogen peroxide is H2O2, which means it is water (H2O) with one extra oxygen. When yeast is added, it acts as a catalyst to split the hydrogen peroxide into water and oxygen. Bubbles of oxygen are trapped in the soap, which transforms into the foam fountain we observe. This experiment is an exothermic reaction; it releases heat. The bottle is warm to the touch after the experiment is over.

Wednesday, October 6, 2010
Homemade Lava Lamp, Part 1 - Your First Try
 There are many ways to make homemade lava lamps. If you surf around the web, you can find directions that vary a great degree in complexity. Here we give you the simplest (and cheapest) approach to making one of your own. It's a great lesson in density, but depending on how far you take it, can also include lessons on solubility and colors.
The salt can be used to make the oil move up and down, but over the long term, you are not going to want to have add salt everytime you want to make the lava move. As an alternative, you can slowly turn the bottle over to see some neat rivulets of lava formed along the wall of the bottle, as the oil moves back to the top of the mixture. This can be done over and over and makes a neat effect. Make sure that the bottle is capped securely before turning, tipping, or shaking the bottle.
Tuesday, October 5, 2010
YouTube of DISCUS at the Texas State Fair

CBS 11 News Coverage of DISCUS at the 2010 Texas State Fair

Sally Ride Science Festival at U.T. Arlington, Oct. 30th

Monday, September 27, 2010
There's a Mad Scientist in All of Us!

Hair Dryer + Ping Pong Ball = Awesome

How does it work? It's a demonstration of Bernoulli's Principle, which says that as the velocity of a fluid increases, the pressure exerted by that fluid decreases. The pressure in the air stream delivered by the hair dryer is lower than the pressure outside of the air stream. When the ping pong ball tries to leave the airstream, the surrounding high pressure air pushes the ball back into the stream, resulting in its levitation above the hair dryer. Hair Dryer + Ping Pong Ball definitely = Awesome in this simple demonstration that anyone can try at home.
Saturday, September 25, 2010
Cool Swirling Milk Demo
 |
| http://chemistry.about.com/ |
In a shallow saucer of milk, place some drops of different color food coloring (in the center, or near the outside rim). The food coloring will just sit there. Using a cotton swab, or an eye dropper, apply a small amount of dishwashing liquid somewhere close to or far away from the food coloring drops. Watch as the colors spontaneously move, swirl, and mix.
What's happening? When the detergent is introduced into the milk, a few things happen simultaneously. The surface tension of the milk is lowered by the detergent, which allows the food coloring and other components in the milk to flow around more freely. Additionally, the structure of proteins in the milk is affected by the detergent; they change shape (denature) and move. Finally, the fat in the milk forms micelles which are pushed around. All of this movement causes the dyes to swirl and move, remotely from the actual application of the detergent.
We are at the 2010 Texas State Fair
- Kevin Schug
Wednesday, September 22, 2010
Thanks to our Electronic Research Administration for our Website

Popular Science Almanac for Kids from BrainPOP.com

Science Wizardry for Kids by M. Kenda and P.S. Williams

Saturday, September 18, 2010
Meniscus.exe and other useful freeware

Friday, September 17, 2010
I Can Buy CaCl2 in the Paint Department? Really?
Over the years I've learned I do not have to purchase everything I need from a chemical supplier. A classic lab every science teacher knows and loves is Chemistry in a Bag. In its simplest form, a spoonful of calcium chloride and sodium bicarbonate are placed in opposite corners inside of a ziplock baggie. Then a small ketchup cup filled with about 1 cm of any pH indicator is gently slid into the baggie so it does not spill, the excess air is squeezed out and the bag is sealed. The student then topples over the ketchup cup and gently massages both the sodium bicarbonate and calcium chloride with the indicator and a chemical change occurs. This is a great lab where students have the opportunity to observe a color change, bubbles, hot and cold spots, and the bag inflate with a new gas produced as a result of the chemical change. There are so many variations of this lab on the internet because it can be easily modified for any grade level and tweeked to illustrate everything from conservation of mass, to gas stoichiometry and limiting reactants. It is also a 10 on the clean-up scale because the baggie just goes into the trash. Here's the kicker- where do you purchase your calcium chloride? Calcium chloride is readily available in any home improvement or big box store as the closet dehumidifier, DampRid. You can purchase a huge tub of it in the paint department or ironing board aisle for a quarter of the cost you would pay elsewhere. I also purchase red cabbage juice extract you mix up like a powdered drink from Educational Innovations. Keeping both of these on your shelves and learning how you can expand this classic lab to meet a variety of curriculum needs will give you a big bang for your buck. Do you have your own version of Chemistry in a Bag you would like to share or do you know of other chemicals you can purchase this easily? Share with us!
Tuesday, September 14, 2010
Think-Pair-Share
Think-Pair-Share is a versatile teaching strategy that emphasizes peer-learning in order to grasp new concepts. Students who have been introduced to a new concept are given the opportunity to contemplate new material. They then pair together with another student and share their understanding of the concept. This strategy can be used during virtually any lesson, especially when the teacher senses that a little more time needs to be spent on a new concept which has just been introduced. A great deal of research has shown that this is an effective technique; basic misunderstandings can be quickly revealed and resolved during the course of peer discussion. An excellent, detailed overview of this technique can be found here.
SCIE 5307 Summer 2009

Sunday, September 12, 2010
EPA Water Science and Technology for Students and Teachers

Thursday, September 9, 2010
Steve Spangler's 2010 Hands-On Science Boot Camp for Teachers
Steve Spangler Science is a great resource for teachers and parents. A variety of informative activities and interesting materials are available through their website, and by purchase. Now, Steve Spangler Science is offering a hands-on boot camp to paid registrants at several sites across the country, where they will teach you their secrets and provide you a whole new perspective on teaching science. Registration costs $189 per person.
Wednesday, September 8, 2010
ACS ChemClub for High School Students

The American Chemical Society (ACS) encourages high school students across the country to form a ChemClub. The goal of ChemClub is to provide opportunities and encourage students to experience chemistry beyond the classroom, get involved in community building, and learn about careers in chemistry. Each ChemClub can have its own unique identity and focus.
National Chemistry Week Poster Contest for K-12

Sunday, September 5, 2010
Cabbage Juice Indicator

Competition for Best Lesson Plan, $200 for 1st Place
Each year DISCUS will survey published lesson plans and award cash prizes to the authors of the best lessons. The first place lesson will receive $200. Second and third place prizes will also be awarded. Build and submit your best lesson plan idea now for a chance to win! More details coming soon.
Friday, September 3, 2010
Creatively Meeting the Challenge
We are two weeks into the new school year and no matter how long we have taught or how well we have planned in the past, we contiually have to change what we are doing to meet the new district and state standards. The student population is ever-changing and what worked for 1st period today may not work for 4th. We have become masters of predicting outcomes and sensing trouble on the way. The vision I have for my blog is to help you solve problems and actively lend support to teaching science. I hope to console you when your day hasn't been the best and inspire you with an idea or topic that has worked for me in the past. Despite the fact we are often tucked away in our own classrooms by ourselves, we are all in this together.
Wednesday, September 1, 2010
Extra Credit for Students at the Fair
Teachers: Assign your students extra credit! Have them come by our booth at the Texas State Fair and fill out a worksheet about what they learn. Worksheets, available at the booth, are tailored to different grade levels and are stamped/signed to ensure validity.
Sunday, August 29, 2010
H2O - Change Me If You Can

Where the Cows Go
Register Now!
Attention Teachers! Register now for free to begin searching, downloading, using, designing, and publishing 5E DISCUS lessons.
Giant Bubbles

Ever wonder why bubbles are round? This is because nature wants to minimize surface energy by minimizing surface area. To learn more about bubbles, visit http://www.bubbles.org/.
Texas Parks and Wildlife Magazine

Butterfly Chromatography

This activity was compiled by Heather D. Tippens and is recommended for children in grades K - 3.
Jennifer Cruze
DISCUS is delighted to have help and input from Mrs. Jennifer Cruze, master science teacher and accredited SIOP instructor at Carroll High School (Southlake, TX). She has been a major driving force and source of ideas for the development of the DISCUS program. Jennifer will regularly write and provide you with useful information, ideas, and insight about K-12 education. Check back often for new posts from Jennifer.
20 Lesson Plans
There are now 20 lesson plans published on the DISCUS site. They are freely available to registered teachers/educators.
2010 Texas State Fair
DISCUS will host a booth at the 2010 Texas State Fair from Sept. 24 - Oct. 4, 2010.
Subscribe to:
Posts (Atom)